Some AquaCUE customers have been manually provisioning endpoints using the steps listed below. These workflows are being phased out, and are included here for reference purposes.
To manually provision a single endpoint, do the following:
- Click the Assets tab and select Provision from the menu on the left.
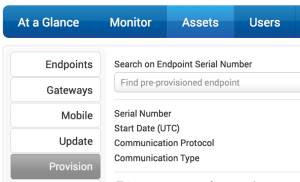
- Search for the pre-provisioned endpoint to be provisioned by typing at least three characters in the search field.
- Check the box to Create new Account from Location.

Note: This causes the Location ID and Location Name to be automatically duplicated as the Account ID and Account Name in the Accounts section of the Assets page. If you want the ID and Name to be different, you must manually enter that data in the Account section of the Assets page.
- Select Create New and enter the Location information.

Note: The Location ID should be a unique number that does not change, even when a new tenant moves in or a meter is changed out. - Select Create New and enter the Meter Details.

Note: The Meter ID should be the number engraved on the meter itself. If more than one meter is being installed at the same location, you must enter a Service ID. - Enter the manufacturer details.
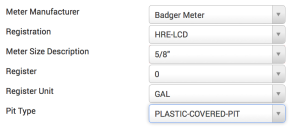
Note: It is vital that you select the correct Register type. If your register has an LCD display, use HRE-LCD. If it is a Badger Meter 8-dial HR-E register, select HR-E. If it is a standard 6-dial ADE register, select either Model 25 or T- 200.For a complete list of Badger Meter encoder registers, see BadgerMeter.com. - Click Provision Endpoint.


Manually Provisioning Endpoints on Compound Meters
To manually provision the endpoints attached to a compound meter, do the following:
- In AquaCUE, click the Assets tab and select Provision from the menu on the left.
- Search for the pre-provisioned endpoint attached to the low side of the meter by typing at least three characters in the search field.

- Check the box to Create new Account from Location.
Note: This causes the Location ID and Location Name to be automatically duplicated as the Account ID and Account Name in the Accounts section of the Assets page. If you want the ID and Name to be different, skip step 3 and manually enter account data in the Account section of the Assets page. - Select Create New and enter the Location information.

Note: The Location ID should be a unique number that does not change, even when a new tenant moves in or a meter is changed out. - Select Create New and enter the Meter Details.
Note: The Meter ID should be the number engraved on the meter itself. If more than one meter is being installed at the same location, you must enter a Service ID.
- Enter the manufacturer details, and use the Registration drop-down menu to select the compound meter type installed at the location.Note: It is vital that you select the correct Registration type. If your register has an LCD display, use HRE-LCD Compound. For a complete list of Badger Meter encoder registers, see BadgerMeter.com.

- For the low side of the meter, use the Register drop-down menu and select register 0.

- Use the Meter Size Description drop-down menu and select the size of the meter.

- Use the remaining drop-down menus to select the unit of measure and pit type.
- Click Provision Endpoint.

- Search for the pre-provisioned endpoint attached to the high side of the meter by typing at least three digits of its serial number in the search field.

- Enter the Account ID that was used in step 3.
- Click Re-use Existing to select the Location information associated with the low side of the meter.
- Click Re-use Existing to re-use the meter details associated with the low side of the meter.
- Use the Register drop-down and select 2 for the high side of the meter.

- Click Provision Endpoint.


