From the Users page, tabs on the left side of the screen let those with Admin or Support roles:
- View, manage and export lists of Facility Staff, EyeOnWater Users and Customers.
- Invite users to create AquaCUE Logins.
- Assign predefined and custom roles and permissions to facility staff and guest users.
- Assign and manage Access Filters.
- View and export a list of customers with EyeOnWater logins along with related details.
- View and export a list of customers who signed up for EyeOnWater and have yet to verify their email address via a verification email.
- View and export a list of your customers along with their Account ID and if applicable their EyeOnWater User Name.
- Manage EyeOnWater accounts by granting or removing user access to one of more EyeOnWater accounts.
Staff Tab
Click the Staff tab to display a list of Facility Staff members, along with:
- Their status and user role (green dot = active, blue dot = pending)
- Their Assigned Filter
- The date of their last activity
- The date their AquaCUE account was created.

To personalize your staff listing, use your AquaCUE sign-in email address and upload a picture here.
Click Export to download a list in CSV format of all Facility Staff members. The list includes their:
Full Name
Status
Role
Email address
Date they were added to the system
Date Updated
Timezone
User Name
Mobile access status
Assigned Filter
User Creation Method (see table)
| User Creation Method | Description |
| AquaCUE Invite | Invited to use AquaCUE by an Admin user via Users page>Staff tab>New User. |
| API | SSO user created by Badger Meter personnel. |
| Ap_Onboard | Accounts Payable User created by Badger Meter personnel during initial setup. |
| Onboard | Owner created by Badger Meter personnel during initial setup. |
| SAML | SSO User. |
Invite New Users

Click New User and follow the steps below to invite a staff member to create an AquaCUE account.
TIP: Users who need access to both AquaCUE and EyeOnWater must use unique email addresses for each system. If someone has a gmail account, they can easily add a “label” to the email address so that, for example, name+facility@gmail and name@gmail can be used to log in to AquaCUE and EyeOnWater, respectively.
- Enter the user’s full name, email address (required) and, if desired, phone number.
- Use the drop-down menu to choose a role. Predefined roles include Admin, Support, Installer and Manager. Custom Roles created using the Roles tab will also be displayed. The table below describes the permissions granted to each predefined role.
- Click Invite User to complete the process. Click Cancel to start over.
About User Roles
AquaCUE stores a lot of sensitive data–customer names, addresses, phone numbers, email addresses and other things that by law or regulation must remain private and secure. AquaCUE users range from facility managers and customer service representatives to field technicians, consultants, property managers and more. To control who has access to what data and by extension the pages of AquaCUE where that information is displayed, each user is assigned a role. Predefined roles include Admin, Support, Installer and Manager along with Custom Roles created by facility Admin users (see below for details).The Manager role lets you grant district, department and property managers access to limited, customizable meter/account groups.
In addition, user roles determine who can import data on the Assets>System Sync page, who can export data via the Monitor page and with the Web Services APIs, and who can create field assignments from the Monitor page Actions menu.
The table below shows the predefined permissions granted to each role.
Group Tab AquaCUE Features Roles Admin Support Installer Manager AquaCUEGeneral Facility Settings View X Edit X Deep Links View X Create X Edit X Delete X At A Glance View At A Glance X X X View Modules Device Health X X X Flow Health X X X Valve Status X X X Gateway Health X X X Billing Reads X X Top Accounts X X X Communication Health X X X System Water Usage X X X System Water Temperature X X X System Water Pressure X X X Monitor View Monitor Page X X X X Actions Export Data X X X X Create Field Assignments X X Data Labeling View Tags X X Create Tags X Create Emergency Tags X Delete Tags X Create Notes X X Card Actions View Deep Links X X X Modify Alerts X Analytics View Analytics Page X X Actions Export Data X X Manual Provisioning Accounts View X Create X Edit X Locations View X Create X Edit X Services View X Delete X Provision Endpoints Modify X Mobile Reading Handhelds View X X Pair X Unpair X Clear Assignments X Reader Codes View X X Create X X Edit X X Delete X X Assets View Assets Page X X Endpoints View X X Export X X Gateways View X X Export X Edit X Downloads View X X Transfers View X Create X Data Diagnostics View X Valves Schedule Actuation X Data Exchange Fieldsets View X X Create X X Edit X X Clone X X Delete X X Export X X System Sync View X X Run X Search X X FormatC-to-DE View X Edit X API Access Can Modify Records X Can Get Records X AAG Billing View X Modify X User ManagementGeneral View Users Page X X Masquerade Masquerade Masquerade as Staff X Masquerade as Customer X X Staff Users Staff View X X Export X X Edit X Toggle Active X X Remove X X Invite X Change Role X Staff Roles View X Modify Roles X Customers Customers View X Export X EyeOnWater EyeOnWater Users View X Export X Modify Account Access X Export Activity X Create Custom User Roles
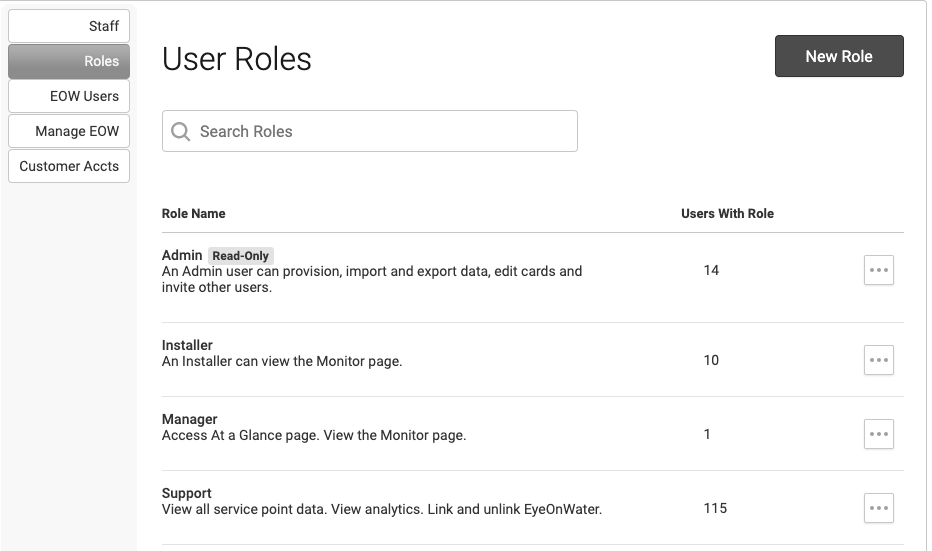
Use the Roles tab to:
- Assign predefined roles and permissions to facility staff and guest users.
- Customize Support, Installer and Manager roles and assign them to facility staff and guest users.
- Create new roles from scratch or new roles that are based on existing Admin, Support, Installer, Manager and custom roles.
- Search Roles and see the number of users with a specific Role.
- Edit Roles, Duplicate Roles and Delete Roles.
Add New User Role

- Click New Role to get started.
- Click one of the radio buttons to start from a Blank slate or from an Existing Role.

- Click Continue.
If you choose Blank:

- Type the name of the new Role in the Role Name box and, if desired, provide a description in the Description box.

- Use the drop-down menus to select the features to which you want to grant access. Checking the box next to a feature toggles access on and off.
 In the screenshot above, access has been granted to the At a Glance and Monitor pages and the modules checked in green.The User Management tab lets you grant permissions related to people, e.g. facility staff, masquerading, customers and EyeOnWater users.
- When finished, click Save to store the new Role. Click Cancel to discard your changes.
If you choose From Existing Role:
- Use the Choose Role drop-down menu and select one of the Existing Roles to modify.
- Click Continue and follow steps 1-3 above.
- Click the … button (circled in red below) to Edit, Duplicate or Delete a Role.

Note: Roles can only be deleted when no users are assigned to them.
Tip: Duplicate a role when you want to create a new role based on an existing role.
Note: Data Exchange System Sync Run gives Admin users permission to use Web Service APIs and import data via System Sync on the Assets page.
Search Staff
Start typing in the box. The system will auto-fill based on the first two characters entered.

Use the drop-down menu to filter results by Status, Role, Special Role Filter Set and Disabled.

Customer Accts TabClick the Customer Accnts tab to see a list of all your customers, their name, Account ID and if applicable the email associated with their EyeOnWater account.

Use the Search box located in the upper right beneath the Actions menu to quickly lookup a customer by name or email address.
Users with Admin or Support roles can click a customer’s name to get a snapshot of their account details.

Click an EOW User Name to login as that customer and see their EyeOnWater dashboard. To return to AquaCUE, click Signout. Do not use your browser back button, because your access will be restricted to that of an EyeOnWater user.

Use the Actions drop-down menu to Export Accounts to File, and get a list of customer names, Account IDs and EyeOnWater user names (email addresses).

Use the pagination controls at the bottom of the page to display different groups of customers.

EOW Users TabClick the EOW Users tab to see EyeOnWater user statistics and a list of customers with EyeOnWater accounts.
The Pending EOW Users section lets you see which customers signed up for EyeOnWater, were sent an email to complete the signup process and have not clicked the link to verify their address.
- The Pending Created field shows the date the verification email was sent.
- The User Accessed field shows the date the verification email was opened by the user.
- The Expiration field shows when the email verification link is due to expire.
Pending users clear after they click a link in the email to verify their address.

Click Filter to sort filter EyeOnWater accounts by Zip Code, Route (shown below), Cycle, District, Class Code and Class Code Normalized. In addition, search for individual EyeOnWater accounts by entering the email address associated with the account and clicking OK. To reset the filters, click Cancel.

NOTE: Facilities that are using the billing portal premium service will see the Customers page instead of the EOW Users tab. Click here for detailed information about the Customers page.
Use the Show Accounts drop-down menu to select the number of customers to display on the page. Use the pagination controls to display different groups of customers

Users with Admin or Support roles can click a customer name to get a snapshot of their account details.
Click a user name to login as that customer and see their latest EyeOnWater report. To return to AquaCUE, click Signout. Do not use your browser back button, because your access will be restricted to that of an EyeOnWater user.Use the Actions drop-down menu to Export Data to a File, and get a list of your customers along with their user name, email address, user status, signup date, their Account ID and Account Name.